


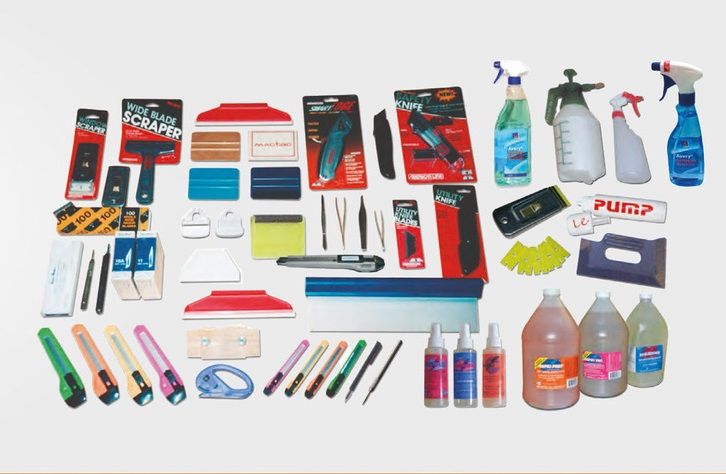
General
FITTING HINTS & TIPS FOR SIGN VINYL, TINT & GARMENTS
Jul
Sign Vinyl Fitting Instructions
Fitting of Sign Vinyl Graphics
Step 1 The most important part of Graphic Application is PREPARATION!
Ensure that the surface is suitable and clean, using RAPID PREP (30), and if necessary the Q.R TOOL TOOL to remove any impurities from the surface.
ALL WAX, OIL, SILICONE OR POLISH MUST BE REMOVED BEFORE ATTEMPTING TO APPLY ANY JOB.
Step 2 Lay the graphics face down exposing the white wax paper backing, peel this back to reveal the ‘adhesive side’ of the Graphics. Then lightly apply a mist of RAPID TAC (28) from the spray bottle or better still from the LE PUMP SPRAY! – this should be applied to the Graphic and the surface to which it is being applied.
Step 3 Lightly position the Graphic in the desired position, checking alignment thoroughly.
Step 4 Using a squeegee, we suggest the AVERY PRO FELT (22), press and work the fluid from underneath the centre of the Graphic to the edge and out from the side using a herringbone pattern of squeeging overlapping strokes, so as not to leave a drop of fluid underneath the surface.
Step 5 After thoroughly squeeging over the complete surface of the premask, take a corner of the premask and roll it back on itself so as to reveal the Graphic.
Step 6 Over squeegee the Graphic with the felt side of the AVERY PRO FELT to leave the decal finger mark free and fully installed.
Step 7 A job well done…. now take yourself off to the pub, but first remember to call 07860 451 090. It is your round after all this free advice!!!
Fitting Of Window Film (Tint)
The most important part of Window Tinting is PREPARATION!
Always check legal requirements on vehicle windows and safety on double glazed units. Ensure that installation takes placein a warm, still and dust free environment. Thoroughly clean the glass with RAPID PREP (30) and NARROW SCRAPER.
Step 1 Spray clear water from your TANGO (35) on the outside of the window. Place the film on the outside of the window and cut it to the approximate size and shape.
Step 2 If the windows are curved (as in car windows) place the ‘TINT’ the ‘wrong way round’ on the outside of the window and gently heat from an Air gun or Hairdryer, so as to heat shrink the tint to shape.
Step 3 Delaminate the release liner (clear) from the TINT.
TOP TIP Use two pieces of sellotape or masking tape to seperate the TINT from the liner.
Step 4 Spray the inside of the glass with RAPID TAK (28).
Step 5 Place the TINT in position then using the AVERY PRO FELT (22) press and work the fluid from underneath the centre of the TINT to the edge and out from the side using a herringbone pattern of squeeging overlapping strokes, as not to leave a drop of fluid beneath the surface.
Step 6 Using a hot air gun or hairdryer eliminate all traces of fluid from under the TINT – checking on the ‘outside’ that all is looking fine.
Step 7 When the TINT has fully dried out trim 2mm from the top edge of the window and seal with clear varnish or nail polish so as to avoid ‘peel back’.
WARNING Always be very careful when TINTING a rear window as they often have heating elements on the surface (DO NOT CUT ON THE GLASS).
Step 8 A job well done…. now take yourself off to the pub – but first remember to call 07860 451 090, after all this free advice it’s your round!!!
REMOVAL OF VINYL DECALS
Step 1 Apply direct heat from a heat gun or hairdryer.
Step 2 Use the QR TOOL to remove the graphic without scratching.
Step 3 Use RAPID REMOVE (29) fluid to release adhesive from the surface and wipe with clean lint free cloth.
GARMENT MATERIAL
Step 1 Place the material in cutter, material side up (backing/carrier face down).
Step 2 Cut material in mirror image with the blade force set to 100-110gf (Refer to machine manual).
Step 3 Weed away the excess material.
Step 4 Place transfer onto garment (adhesive backing face down) and press transfer for 20 seconds at 170 degrees, medium pressure, hot release for Hotflex, 10 seconds, 150 degrees, medium pressure, cold release for Glitter, 10 seconds with silicone paper over transer at 160 degrees, light pressure, cold release for Nylo Cut 10 seconds, 170 degress, medium pressure, cold release for Flock.
Step 5 Remove/peel the backing/carrier straight away (best to peel when hot)
All accessories mentioned above can be found at:https://www.thevinylcorporation.co.uk/accessories/